Recipe 13 – Blueberry Cinnamon Buns
RecipesBrownie Point Rating: 9/10
Makes: 12 individual buns
Prep and Cooking Time: 3 hours
Cinnamon buns are amazing. Blueberry Cinnamon buns are mind-blowing. These are soft, sweet and tasty as hell. They’re topped with a whisky and blueberry glaze and drizzled with a blueberry icing. These will earn you some serious kudos.
Equipment You’ll Need:
1 large mixing bowl
1 big spoon
A sieve
1 saucepan
1 large cake or roasting tin, (25cm square tin ideally)
Ingredients
For the dough:
500g strong white bread flour
1 tsp salt
50g caster sugar
7g dried yeast
75g softened unsalted butter
200ml milk
1 egg
For the filling:
2 tsp cinnamon
1 tsp ground ginger
150g light brown sugar
100g softened butter
2 shots of Jack Daniels/other bourbon or whisky
50g caster sugar
30-35 blueberries (frozen or fresh)
1 tablespoon of icing sugar
1. Stir together the flour, salt, yeast and caster sugar in a bowl. Rub 75g of softened butter into the flour mixture with your fingertips until there are no large lumps of butter. It doesn’t have to be as fine a mixture as if you were making a crumble – just get rid of any large lumps of butter.
2. Make a well or recess in the flour mixture. Pour the milk into the recess and crack in your egg. Bring the dough together with your hands until everything is bound together. The dough will be quite sticky at this point – don’t worry as this is normal!
3. Turn the dough out onto a clean surface and knead for 10 to 15 minutes or until the dough is smooth and elastic. You should be able to stretch the dough quite some way and quite thinly without it breaking by the time it’s ready. If you have a food mixer with a bread hook, you can use that – it should only take around 10 minutes. Give your mixing bowl a quick clean, give it a thin coat of a flavourless cooking oil and return your dough to it. Cover with clingfilm and leave to prove for between 60 and 90 minutes, until it’s nearly doubled in size.
4. While the dough is proving, make the filling. Put your blueberries in a saucepan with the whisky and a small amount of water. Simmer very gently for 3-5 minutes. Remove the blueberries from the saucepan and keep the liquid that remains – pouring the mixture through a sieve placed over a bowl is ideal.
5. Beat the brown sugar, ginger and cinnamon into 100g of softened butter in a bowl with a fork until it looks like a paste. Set it to one side, making sure it doesn’t start to melt.
6. Grease and line your baking/roasting tin.
7. Assuming your dough has nearly doubled in size, tip it out on to a clean work surface and knock the air out of it, (basically punch it around a bit!) Roll or stretch the dough into a rectangle about the thickness of a pound coin. The long side of the rectangle should be about 35-40cm.
8. Spread the cinnamon and butter paste over the surface of the dough, ensuring the paste reaches all the edges. Scatter your part-cooked blueberries evenly over the top of the paste.
9. Starting on one of the long-sides of your dough rectangle, roll up the dough into a sausage shape. Scatter some flour on your work surface, place the dough sausage on top and cut into 12 equal slices.
10. Place the slices side by side, with a spiral side facing up, into the greased roasting/baking tin. Cover with a damp tea towel or clingfilm and leave to prove again for about 45 minutes. Preheat your oven to 200C.
11. Once the buns have grown in size by about 30% and feel soft and springy to the touch, put them in the oven. You should bake them at 200C for about 5 minutes, then reduce the temperature to around 170C for a further 20-25 minutes until golden brown.
12. Return the liquid you cooked the blueberries in to a saucepan, add the remaining caster sugar and stir until dissolved. Bring the liquid to the boil and cook for around 5 minutes until slightly thickened. Remove from the heat and leave to cool.
13. Remove the rolls from the oven when they’ve finished baking and brush with some of the syrup whilst they’re still warm. Once cooled slightly remove the rolls from the tin and leave to cool on a wire rack.
14. Pour a small amount of the remaining syrup into a small bowl and add the icing sugar. Mix thoroughly to make a drizzle icing. Use a spoon to drizzle the icing over the cool buns and serve.
Bloke Tip: Don’t like blueberries? You can make more traditional cinnamon buns by replacing the blueberries with a few handfuls of dried fruit/sultanas, dropping the whisky down to one shot and adding two shots of orange juice to the liquid in step 4.
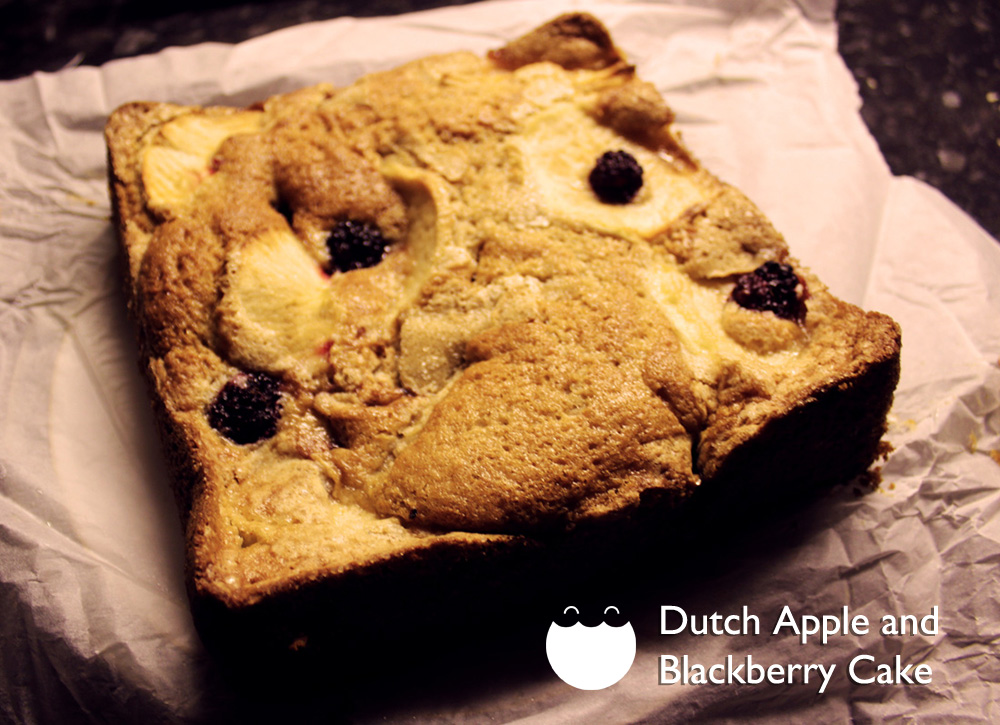
Recipe 12 – Dutch Apple and Blackberry Cake
RecipesBrownie Point Rating: 7/10
Makes: 1 cake, (enough to serve up to 9, or 6 generous portions.)
Prep and Cooking Time: 1.5 hours
This sounds a hell of a lot fancier than it is. The ‘Dutch’ part comes from a slight variation in the way it’s made compared to a normal sponge cake. It stays really moist for a few days, and the apples and blackberries are a great combination.
Equipment You’ll Need:
1 large mixing bowl
1 whisk (preferably electric!)
1 big spoon
A sieve
1 saucepan
1 large cake tin, (20cm square tin ideally)
Ingredients
200g self-raising flour
120g unsalted butter
225g caster sugar
3 eggs
100ml milk
1 tsp vanilla extract
1 tsp ground cinnamon
1/2 tsp ground nutmeg
1 large cooking apple
10-12 blackberries
1. Preheat your oven to 200C. Line your cake tin with greaseproof/parchment paper and grease with some butter.
2. Whisk together your eggs, caster sugar and vanilla extract in a large bowl until the mixture is thick and like a mousse. You can tell it’s ready if you drag the whisk through the mixture and the line stays visible.
3. Melt the butter in a saucepan with the milk. Leave to cool for five minutes, then pour slowly over the egg and sugar mixture, whisking it the whole time.
4. Sift the flour, cinnamon and nutmeg into the bowl and fold it into the batter, making sure there are no lumps of flour left. Pour the mixture into your prepared cake tin.
5. Scatter your blackberries on top of the mixture, then peel and core your cooking apple and cut it into thin-ish slices. Arrange these over the top of the batter and blackberries, sprinkle with a little extra sugar, and put in the oven.
6. Bake for 10 minutes at 200C, before reducing the oven to 180C and baking for a further 20 minutes or so, until the cake is golden brown and risen well. You’ll probably notice that the fruit has sunk into the cake…this is meant to happen!
7. Allow the cake to cool in the tin, before cutting it into squares and serving warm, (though the cake should stay pretty fresh for a good 2/3 days, and can be heated up in the microwave if you really need to!)
BLOKE TIP: Blackberries not in season? Don’t like apples? Try mixing the fruit up. Pineapple and blueberry would work quite well, as would peach and raspberry I think.
Recipe 11 – Dark Chocolate and Raspberry Tart
RecipesBrownie Point Rating: 9/10
Makes: 1 tart, (enough to serve 8)
Prep and Cooking Time: 2.5 hours
Relatively quick, easy, tasty. This is a very rich tart but the raspberries add a bit of sharpness to cut through the chocolate and cream. Looks impressive but relatively easy to make!
Equipment You’ll Need:
1 large mixing bowl
1 big spoon
A sieve
1 large saucepan
1 Tart/Flan case
Ingredients
Pastry:
200g white flour
100g Trex (vegetable fat for baking – more reliable than butter for pastry.)
Pinch of salt
50g icing sugar
Small amount of water
Filling:
300g dark chocolate
50g milk chocolate
300ml single cream
10 – 12 raspberries (frozen or fresh)
Cocoa powder to decorate.
1. Sift the flour into a large bowl and add the Trex, pinch of salt and icing sugar. Rub the ingredients to the consistency of breadcrumbs.
2. Add a splash of water and bring the mixture together into a ball with your (clean) hands. It’s best to add the water a tiny bit at a time – you should use just enough to bring the mixture together.
3. Wrap the pastry in cling film and leave in the fridge for at least 30-40 minutes to chill, (or the freezer for 15/20 minutes if you’re in a big rush.)
4. Take the chilled pastry out of the fridge and roll to size/shape to fit your pastry case evenly. Patch up any holes with spare pastry, trim the edges straight and put back in the fridge/freezer for another 30 minutes. Pre-heat your oven to 170 degrees.
5. Remove the pastry from the fridge/freezer, line the pastry with greaseproof paper and fill with baking beans/rice before putting in the oven for 15 minutes. Then remove the paper and baking beans and bake for a further 5 minutes. (If you’re unsure what to do, read up on ‘Blind Baking’ here.) Leave to one side to cool.
6. For the filling, break up your chocolate into small pieces, then pour the cream into a saucepan and heat on the hob, (stirring occasionally,) until it’s just about coming to the boil. Remove from the heat and add the chocolate. Stir until the chocolate is melted and the mixture is smooth.
7. Scatter the raspberries evenly into the pastry case, then pour the chocolate mixture over the top. It should come up just below level with the top of the pastry case.
8. Place the whole tart in the fridge to chill and set. Before serving, dust the top of the tart with cocoa powder and some extra raspberries.
BLOKE TIP: You can make a vanilla cream to accompany the tart – whip up some double cream in a bowl with a whisk until thick then fold through some vanilla extract. Add a dollop and some grated chocolate to the top of the tart before serving.
It’s been a long time, we shouldn’a left you, without some nice cakes to…munch…on…
Random MusingsSoooo I’ve been away a while. I got things off to a good start and then it all sort of stopped. Well I’ve been traveling for the last few months – took myself to Australia, New Zealand, Fiji and the good ol’ U.S of A. I had an absolutely incredible time, met some fantastic people and saw a lot of amazing things. I also got to do some baking in some very…’interesting’ circumstances and kitchens, including a middle-of-nowhere hostel, a 200,000 acre sheep farm and a campfire just outside Yosemite National Park. I saw more than ever that baking and eating the results of baking really can bring people together, and is an excellent way of making new friends, (and impressing women. Yep.)
All this has meant that I’ve got lots of new ideas for recipes, (Australian pies, New Zealand Kiwi Pavlova, incredible American cheesecakes!) and still have my passion for baking, so this blog will now be back up and running from today! Send me ideas for recipes you’d like to see or cakes, buns and breads you’ve always wanted to make but couldn’t, and keep the feedback coming! It should be a busy few months ahead…
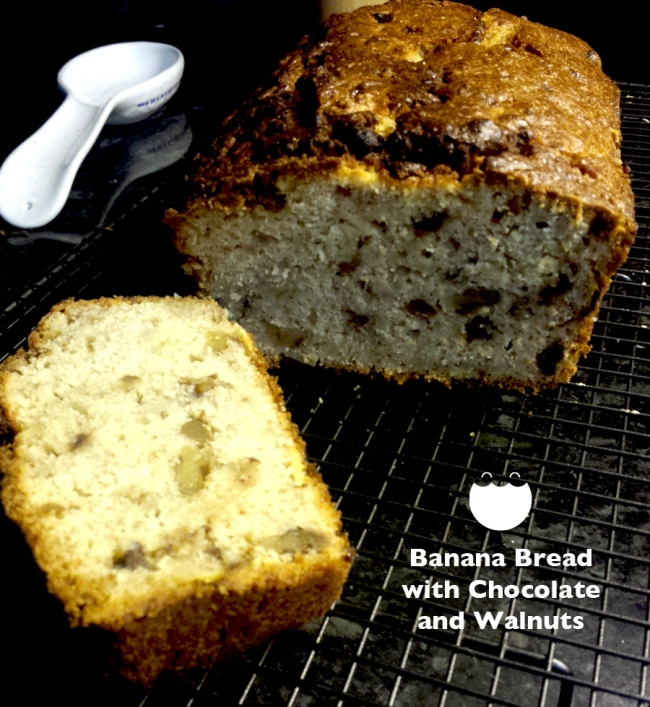
Recipe 10 – Banana Bread with Chocolate Chips and Walnuts.
RecipesBrownie Point Rating: 8/10
Makes: 8 – 10 portions
Prep and Cooking Time: 90 Minutes
This isn’t strictly bread, but it is amazingly tasty. Moist, with a bit of texture from the nuts and chocolate, this makes a great Saturday morning breakfast treat with a nice cuppa. Pop it under the grill for a few minutes to melt the chocolate chips and you’re on to a winner.
Equipment You’ll Need:
2 large mixing bowls
1 big spoon
A sieve
1 loaf tin
Cooling rack
Ingredients
285g self-raising flour
1 tsp bicarbonate of soda
1/2 tsp salt
110g unsalted butter, with a little extra for greasing your tin
225g caster sugar
2 large eggs (free range)
5 ripe bananas, mashed up
2 tbsp greek yoghurt
1 tsp vanilla extract
70g chopped walnuts
100g of milk or dark chocolate chips
1. Preheat your oven to 180C, and grease your cake/loaf tin.
2. Sift the flour, bicarbonate of soda and salt into one of your mixing bowls.
3. In your other mixing bowl, cream together the butter and sugar until it’s light and fluffy. (This works best if the butter is at room temperature – cut it into cubes then beat it together with the sugar.)
4. Whisk up your eggs and add them to the butter and sugar mixture along with the yoghurt, mashed banana and vanilla extract and mix well. Add the walnuts, chocolate chips and flour mixture and fold together, ensuring there’s no pockets of flour remaining.
5. Pour the mixture into your cake/loaf tin. Pop in the oven and leave to bake for about an hour, or until well-risen, golden brown and cooked through.
6. Remove from the oven and leave to cool for a few minutes in the tin, before turning out onto a wire cooling rack to cool fully before cutting into slices and serving.
BLOKE TIP: It also goes really well with custard. I just found that out.
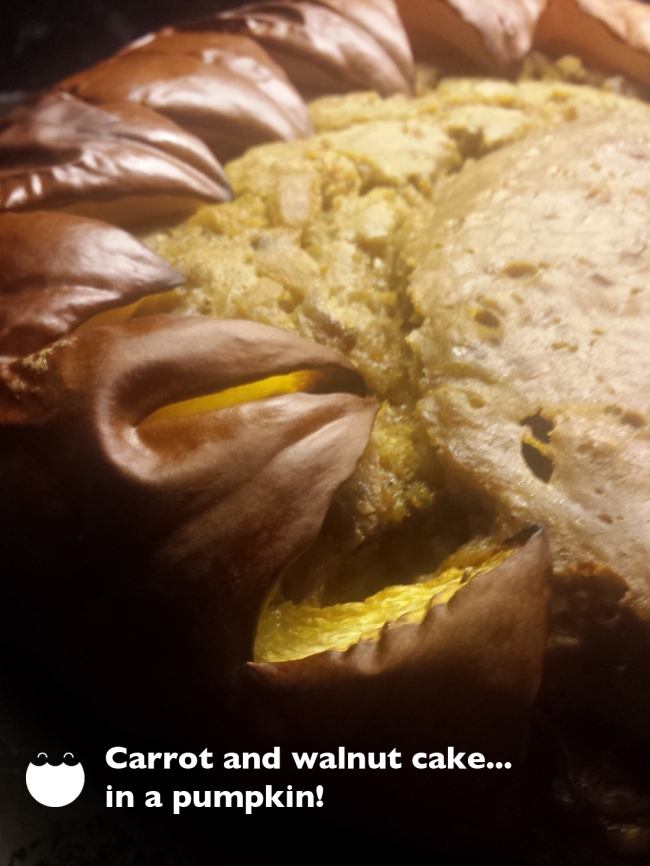
Recipe 9: Carrot and Walnut Cake…in a Pumpkin!
RecipesBrownie Point Rating: 8/10
Makes: 1 huge cake in a pumpkin, (will serve 12-15,) or two smaller cakes in tins.
Prep and Cooking Time: Around 2 hours.
This is a beast, no other way of putting it! The cake is huge, delicious and serving out of a pumpkin will actually blow people’s minds. The pumpkin also helps to keep the cake lovely and moist, and you can eat everything bar the skin. Well worth a go, even if you just bake it in old-fashioned cake tins.
Equipment you’ll need:
2 Mixing bowls
1 big spoon
Fine grater
2 cake tins (if you’re not using a pumpkin)
Cooling rack
Ingredients
1 medium/large pumpkin
6 large eggs, whisked
300ml vegetable or sunflower oil
300g of carrots, peeled and coarsely grated
200g dried sultanas
100g chopped walnuts
Juice and zest of 1 orange
320g white self-raising flour
2 teaspoons of ground All-Spice
2 teaspoons of cinnamon
1 teaspoon of Bicarbonate of Soda
1/2 teaspoon of salt
300g soft brown or muscavado sugar
1. Cut the top off your pumpkin and scoop out the pith and seeds, (an ice-cream scoop is good for this.) Preheat your oven to 180C.
2. Whisk together your eggs and vegetable oil in a mixing bowl. Add the grated carrots, raisins, walnuts and orange juice and zest and stir together.
3. In a separate mixing bowl sift the flour, mixed spice, bicarbonate of soda and salt. Stir through the sugar.
4. Add the wet mixture to the dry mixture and give a good mix, making sure you don’t have any lumps or pockets of flour in the cake batter.
5. Pour your cake mix into your prepared pumpkin, (or cake tins,) wrap the outside of the pumpkin in foil, and place on a tray in the oven for 90 minutes, or until the cake is risen, golden brown and cooked all the way through, (use a skewer or sharp knife in the middle of the cake to test – if it comes out clean the cake is ready.) You might need to put some foil on the top of the pumpkin about halfway through cooking to stop the top of the cake from burning.
6. When ready, CAREFULLY remove the pumpkin from the oven – it’ll be really tender and if you’re rough with it it can split and break up. Leave somewhere to cool thoroughly.
7. When you’re ready to serve, cut the pumpkin into wedges/slices using a sharp knife. Sprinkle a little more brown sugar over the pumpkin flesh part of the cake and serve.
BLOKE TIP: This cake actually tastes best if it’s left for a day before eating. I found that impossible though. It’s also really good with a drizzle of icing over the top – mix together 4 tablespoons of icing sugar with 1 tablespoon of water, add some grated orange or lemon rind and drizzle over the cake.
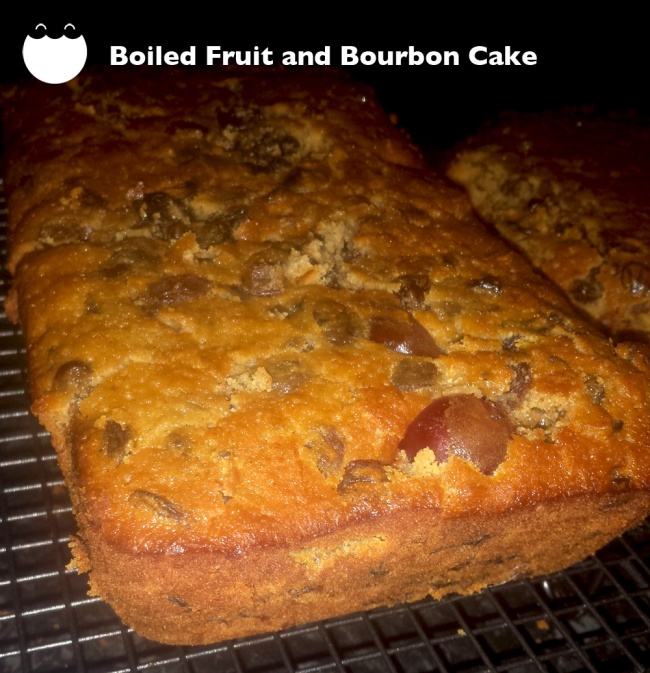
Recipe 8: Boiled Fruit and Bourbon Cake
RecipesBrownie Point Rating: 7/10
Makes: 2 shallow or one very deep fruit cake, (enough to serve 10+)
Prep and Cooking Time: 1 hour 40 minutes
Fruit cake is one of my favourites, though a lot of the ones I’ve had from supermarkets and the like are dry, sickly sweet or just a bit crap. My grandmother makes an amazing fruitcake which I honestly can’t fault, but I wanted to work out one of my own recipes. I took inspiration from her recipe and added some good ol’ whisky and a bit more spice to give a nice manly kick. This cake stays crazily moist, is dead easy to make, and has a nice, slightly spiced aftertaste. A good one to have ready for the guys.
Equipment you’ll need:
1 Mixing bowl
1 Large saucepan
1 big spoon
Fine grater
1 Large or 2 small/shallow cake tins
Cooling rack
Ingredients
250ml water
900g dried fruit mix
225g caster sugar
170g unsalted butter
260g self-raising flour
2 eggs
1 large lemon
75g glace cherries
1 teaspoon of cinnamon
1/2 teaspoon of nutmeg
100ml bourbon whisky
1. Pre-heat your oven to 150C. Use some butter to grease your cake tin(s)
2. Combine the water, dried fruit, sugar and butter in a saucepan over the hob. Bring to the boil, stirring occasionally, and boil gently for about 10 minutes. Remove from the heat and leave to cool in the pan for about 15/20 minutes.
3. Meanwhile, sift the flour into a large bowl and add your spices. Pour in the boiled fruit mixture, grate in the rind of one large lemon, add the whisky and glace cherries, (whole or chopped, up to you,) and stir until it forms a batter. Whisk the eggs in a bowl and stir into the mixture.
4. Pour into your prepared baking tins. There should be enough mixture for one LARGE fruit cake or two smaller ones.
5. Bake your cake(s) for 90 minutes or so. Test if the cake is done by gently pushing a skewer or sharp knife into the middle – if it comes out clean, the cake is ready.
6. Remove the cake from the oven and leave to cool in the tin for at least 15 to 20 minutes. Then remove from the tin and leave to cool fully on a wire cooling rack.
BLOKE TIP: You can do a lot with this recipe. Add some nuts to the mix, (walnuts work well,) replace the whisky with different types of booze, (orange liqueur or rum especially,) or even add a good dark chocolate into the mixture or as a topping.
Recipe 7: Plum Cobbler
RecipesBrownie Point Rating: 7/10. 8.5/10 after a Sunday Dinner.
Makes: 1 Cobbler (Enough to Serve 6 large portions.)
Prep and Cooking Time: 45 Minutes.
Ok, stop sniggering at the back. I know it’s called a ‘Plum Cobbler’. It might sound like a dodgy Victorian metaphor but it’s absolutely delicious – spiced plums, juicy sultanas and a soft scone topping that soaks up all the flavours. Really quick, really easy, really good after Sunday Lunch/Dinner…with lots of custard or pouring cream.
Equipment you’ll need:
1 Mixing bowl
1 Medium saucepan
1 big spoon
Fine grater
Pie/casserole dish
Small sharp kitchen knife
Ingredients
200g Golden caster sugar
15 Fresh plums (most varieties will work – I used a mix of Golden and Victoria plums)
1 teaspoon ground cinnamon
1/2 teaspoon ground allspice
1/2 teaspoon ground ginger
1/4 teaspoon ground nutmeg
75g dried sultanas
200g self-raising flour
1 teaspoon baking powder
1/4 teaspoon salt
100g butter
120ml milk
2 eggs
1. Preheat the oven to 175°C.
2. Carefully slice the plums in half and remove the stones.
3. Add the plums to the mixing bowl with 3/4 of the sugar and all the spices and gently toss them around. Transfer into the bottom of the pie/casserole dish. Sprinkle over the sultanas.
4. In a medium bowl, combine the remaining flour, baking powder and salt. Cut the butter into cubes and rub into the flour mix until the texture becomes like coarse breadcrumbs. Whisk the milk and eggs together, pour into the flour mix and stir into a stiff batter.
5. Drop spoonfulls of the batter on to the fruit in the pie/casserole dish. You don’t have to cover the fruit entirely as the mixture will spread a little during cooking. Sprinkle lightly with a bit more sugar.
6. Bake for 35 minutes until the topping turns a golden brown.
BLOKE TIP: Don’t like plums? (What’s wrong with you?!) You can make this recipe with apricots, peaches, apples, blackberries, blueberries…
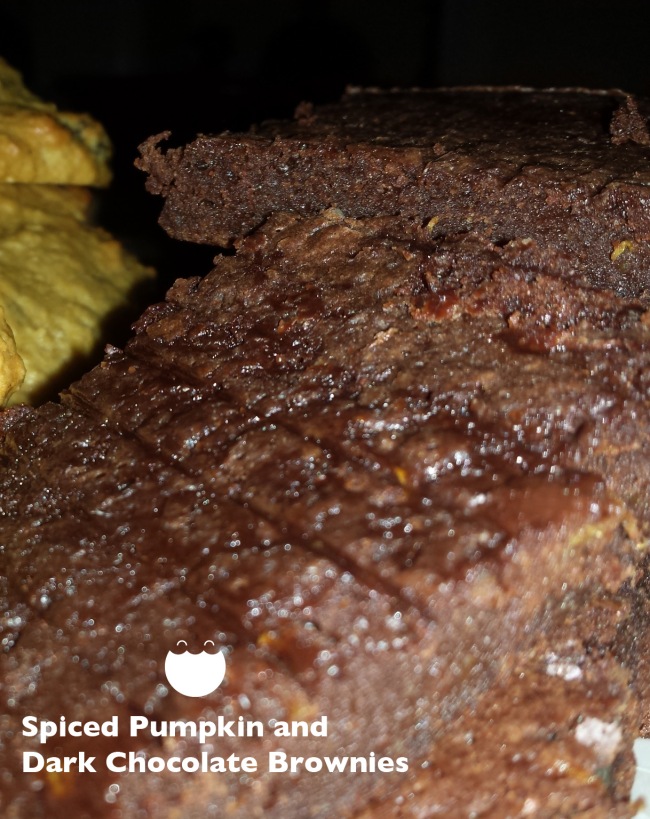
Recipe 6: Spiced Pumpkin and Dark Chocolate Brownies
RecipesBrownie Point Rating: 9/10
Makes: 16 brownies
Prep and Cooking time: 50 minutes
I love chocolate brownies. I love pumpkin. It just made sense. This was a total experiment but one that worked very well – they took next to no time to make, the spices bring out the flavour of the chocolate and the pumpkin keeps them crazily moist. The batch of 16 I made this weekend all went in 2 days…
Equipment you’ll need:
1 Mixing bowl
1 Medium saucepan
1 big spoon
1 brownie/baking tray
Cooling rack
Ingredients
80g butter
150g Dark Chocolate
165g brown sugar
The flesh of about 1/2 a medium-sized pumpkin
2 eggs, whisked
1 teaspoon vanilla extract
140g self-raising flour
1 tablespoon cocoa powder
2 teaspoon ground cinnamon
1/2 teaspoon ground all-spice
30g chopped pecan nuts
1. Preheat your oven to 180C. Grease your brownie/baking tray with some butter. Roast your pumpkin as described in my pumpkin pie recipe and leave the mashed flesh to cool in a bowl.
2. Combine your butter, dark chocolate and sugar in a saucepan and stir over a low heat until melted and smooth. Leave to cool.
3. Transfer your cooled mixture to a large bowl. Stir in the egg, vanilla extract, sifted flour, cocoa powder, chopped walnuts, ground spices and mashed pumpkin.
4. Pour the mixture into your greased baking tray and cook in the oven for 25 minutes.
5. Remove from the oven and leave to cool in the tray for 10 minutes before turning out onto wire rack. Dust with icing sugar and cocoa powder and cut into 16 squares.
BLOKE TIP: You can ramp up the flavour of the brownies by adding a couple of pinches of dried chilli flakes, (chilli and chocolate work together really well, and the pumpkin helps temper the heat,) or a shot of whisky to the mix before cooking. If you do decide to add the whisky, add 5-10 minutes to the cooking time to help cook off some of the alcohol and to make up for the extra liquid.


